Thursday, June 30, 2016

M wagon body

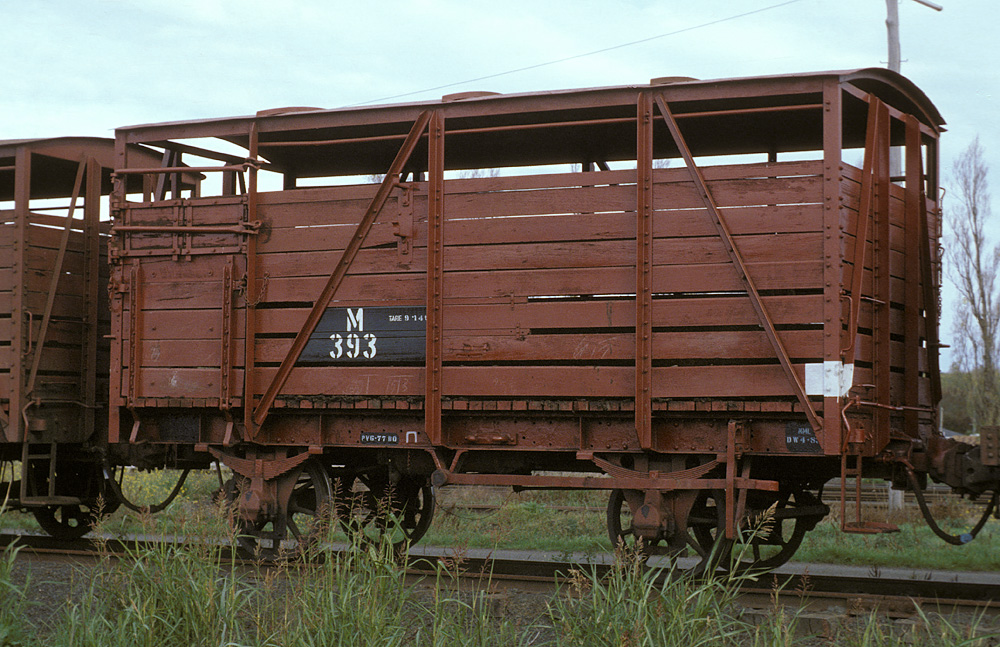
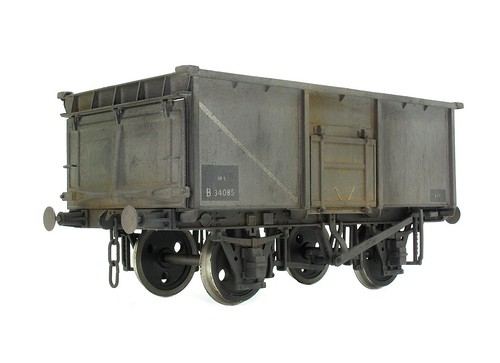
Four plastic sides, easy enough you might think, and you'd be nearly right. They have to be made into a 2 L-shaped parts as there is a gap along the bottom edge of each side. Only the door touches the floor.  It's not rocket science though and I like the way the angle irons on the side neatly match as they curve around onto the solebars.

At the ends, a lever is bent up from wire with the aid of a jig on the sprue. I managed to ping one length of the supplied 0.3mm wire into the distance. The replacement 0.33mm from Gibson proved to much easier to bend accurately. Maybe a different blend of metals? 

From the etched part selection there's several handrails which on a British kit you'd be expected to bend from more wire. I'm not sure which is best, although the etched ones are nice. All metal is stuck in place with Zap green glue, which seemed to be working faster than normal, just when I needed a little wiggle time!

Wednesday, June 29, 2016

Warehouse Wednesday: Gawler goods shed

Since I'm building an Australian wagon this week, it seems appropriate to present an interesting building from the same country this week.

Gawler Goods Shed road side

Gawler is the terminus of the line from Adelaide and the destination of my first Aussie rail journey. 

The goods shed is remarkably well preserved, and still in use as some sort of store although not rail served any more.

Gawler Goods Shed rail side

If you'd like to explore more,you can via Google Streetview. It doesn't look as hot and dusty as I remember it in the Google pics...

Tuesday, June 28, 2016

M wagon chassis


Australia and Britain are two countries separated by half a planet and a common language.  According to the excellent instructions with this kit, down under what we call a "solebar", they call a "sill". There's also the Americanism of numbering drill bits, so we make a 0.7mm or #70 hole for the cross wire. 

Apart from this, chassis construction is pretty conventional to anyone familiar with a Parkside or Cambrian kit. Bearings are provided but moulded in derelin rather than turned from brass. They pop straight in the axleboxes though so no difference. 

Interesting that there are only 4 brake shoes and that they act on the outside of the wheels as opposed to the inside as you find in Britain.

Monday, June 27, 2016

M wagon

A bit more in the way of Aussie projects this week. Tucked away in a box of souvenirs, is a Steam Era Models Victorian Railways 'M' Wagon.
The kit is a modern multi-media production. Most of the parts are very well moulded plastic, with crisp detail. There's also some wire and a small fret of etched details. 


To be honest,I know nothing of the prototype. The kit was bought in a model shop visited in Victor Harbour, the first of many during the trip. I picked it because I liked the quality of the mouldings and the finished model on the packet was suitable "Aussie". 


To be honest, I can't do any better than point you at than this excellent web page over at victorianrailways.net so for more details, head over there.In the meantime, I'll start with the chassis.

Sunday, June 26, 2016

Flettner boat

Flettner boat

This is a yacht. At least it is a wind powered boat. 

Strictly speaking, this is a rotor or Flettner boat. Power is provided by the wind catching the central tube which spins powered by a motor in the hull. You can read more about the concept on Wikipedia. To be honest, the physics is a bit of a mystery but I'm fascinated. 

The boat appeared in our clubhouse along with the modelling bits and bobs from it's builder, Graham Bran, who has sadly died recently. I remember seeing him experiment with this in the water as well as his 2-tube follow up model. At the time we chatted about it which pointed me towards doing some research. 

For the moment I've tucked this boat away in store but one day I want to carry on his work. For the moment it's safe. Let's face it, I'm probably the only one in the club daft enough to want to give it a go!

Saturday, June 25, 2016

Neko Works cartoon Karmann Ghia


Part of my catch-up involves clearing the detritus on my modelling board. After several weeks hard work, it was rather overflowing. Digging through the rubbish and putting away the tools, I found a couple of little kits nestling in the corner behind the turps jamjar. 

One is this Neko Works cast resin cartoon model of a VW Karmann Ghia. I've always loved this car and when I spotted this in the model shop in Sydney, it was cheap and I had to have it, which means it's been kicking around for over 18 months. 

Anyway, the casting took a little cleaning up followed by a spray of car primer. The rest was hand-painted enamel. Hand painted because while spraying would give a superior finish, the masking up would be a fiddly nightmare. 

All went well until it came to varnish the thing. My plan involved a can of car lacquer. That's where it all went wrong. Maybe the can was too old, and I can't remember when I bought it, or one of the coats was too thick, but it's gone a bit white and less than transparent in places. What I should have done is airbrushed a thin coat, that would have been much better. 

One day I'll strip and re-paint the model but for the minute it can sit in the Aussie corner of my display case. 

Blue Neko Works Karmann Ghia

Friday, June 24, 2016

Model making in the Rothchilds garden

Normally I cover the contents of the BRM DVD in the magazine post but I thought this time I'd show a little behind the scenes stuff. 
Outdoor filming

If you've seen the issue, you'll know that much of the action was filmed at Exbury Gardens, home to the Rothschild family and their garden railway.

When planning the shoot, someone came up with the idea that I ought to do a little modelling with the garden as a backdrop. This seemed like a harmless idea until the morning of the shoot where the sea seemed to be falling fronm the sky. Before setting out, I checked there was somewhere covered for me to work.

There was, but as you can see, the sunshine held long enough for me to perch on a bench and use a lightly wobbly folding table to do a bit of fern building.

I can hoestly say I've never built models in quite such a picturesque location though, it was great fun.

After filming, I spent some time chatting to the guys running the railway. Discussing the Vale of Rhiedol, I commented that I rather liked the locos in BR blue.

"You'll be interested to see what I had delivered today then."

Owain Glyndwr

A Roundhouse Rhiedol in the second version of the BR blue livery. As far as its owner knows, this is the only one of these models to carry the colour. The livery has been applied beautifully and certainly sits well on the model.


Thursday, June 23, 2016

Lights and O gauge in BRM


Along the road at night

In the July issue of BRM I'm finishing the retail park diorama started last month.

When we started planning the model it was be relatively simple - a motorised van running around some buildings. This eventually became a retail park and then idea surfaced along the lines of "Let's put some lights on it."

Well dear reader, those lights took a heck of a lot of work. For a start they have to be fitted to the buildings, ideally without any light showing through thin plastic. Then there are street lights to be modified and fitted, plus some spots for the entrance sign. After this, road vehicles also need illumination. THEN you have to wire it all up!

You know what though? The end result looks brilliant. Far better than I'd expected. Turn the lights out in the room and the edges of the model disapear and all you can see are little scenes illuminated in pools of light.I want to do more of this...

O gauge wagon

Wagon building continues as we reach O gauge and a kit I've long wanted to have a crack at. 

The Peco 16 ton mineral has been around for years but always looked an interesting prospect. If I'm honset, the opening doors were the main source of excitement, but then I'm a big kid and like that sort of thing. 

Biggest surprise though when building was that the top rail is hollow. In 4mm we just get a solid piece but the larger scale allows greater fidelity. Whether anyone will spot the difference is a discussion to be had, but I liked it and think the finished model looks great. If you want to see the doors open though, you'll need to buy the magazine!

Finally, Hellingly Hospital makes it into the cut out and keep track plans section.

Wednesday, June 22, 2016

Warehouse Wednesday: AP Leamington

Years ago, Automotive Products (AP) was Leamington Spa's biggest employer. My dad endured a job there for many years as did many of my school friends parents. 

The place was massive but always a bit of a mystery. Cameras were banned from the site in case you snapped photos of something under development. Or because the management thought they stole souls or something. However, in 1990, during an official open day, we grabbed some photos around the factory, which I present today.

AP Pipe bridge

None of these have any great artistic merit, but they do show some interesting and modelable details. The first is a simple pipe bridge. Presumably putting the pipe in a trench was more expensive than over the top on a support high enough to clear lorries driving around the site.

AP stacker trucks

The second is a row of stacker trucks beside an anonymous building. Looking at the other photos, quite a lot of the site was like this - brick walls and pitched roofs with metal frame windows. If someone produces a resin cast version, with only minor modification, most of the plant could be built. 

I like the red cabinet nearest the camera. I think this contains a fire hose and should be a part of most industrial models. Nice and easy to make too.

Tuesday, June 21, 2016

Telephone box resource

Cubbington K6According to the note in my album, this K6 telephone box photo was taken on 26th October 1991 on the Coventry road in Cubbington near Leamington Spa.

I know this because for a long while I've been a real telephone box anorak. If I see a red box, then I am compelled to take a photo of it.

This is of course, great for improving my photography. Take a standard subject and try to compose the best photo of it you can. Do this enough and you might improve.

Mind you, it's scary how old this photo looks. Is that an Austin Landcrab in the background?

Anyway, the reason for this post is that over the weekend, I needed to look up some phone box facts and found a new website that is worth a look because it is beautifully illustrated.

www.the-telephone-box.co.uk

Each box, including the early BT versions, is drawn by someone who obviously a talented graphic artist. There are also facts and photographs. I spent a long time looking through everything.

Monday, June 20, 2016

Merit bus shelter


Struggling to find photos of rural bus shelters for a project, I mentioned my plight on MREmag.com. Today's issue is full of people helping me out. 

Plan B had been to find a Wills kit and copy that in the appropriate scale. Nipping in to my local model shop, of course he hasn't got one on the shelf despite there being an example for a long while. I'd looked at it several times and nearly bought for the fun of assembling a nice kit. 

Second best though was the version from Merit. Bought second hand (£2) it's still available today

I like the design a lot. It dates from the late 1950s to early 60s when there was real optimism about the future. BR was modernising, investing heavily in new stations, shunting yards and diesel locomotives. Concrete was modern and exciting be it brutalist buildings, or on a smaller scale, bus stops. 

Of course we know how all this turned out. The stations might still exist but years of minimal maintainance and endless tinkering to add retail space has ruined the original clean lines. The shunting yards were made obselete by shipping containers and cheap road transport. Those early diesels turned out to be bad investements in many cases. Brutalism was a look that never won many freinds outside the architectural comunity. Bus stops, well steel ones weather better and anyway, people prefer to drive so there's no need to invest in those that are left. 

I still think it's an under modelled period though. 

Sunday, June 19, 2016

PW Trolley

PW trolley

I'm still stupid busy, so here's a photo I took years ago at the Severn Valley Railway of an interesting permanent way trolley. 

Presumably home adapted, it's one you could happily build a model of without worrying about some pesky RTR wallah coming out with one. Making those wheels would be a challenge though.

Saturday, June 18, 2016

Cassiopeia sails!

Cassiopeia sails for the first time.

A rare sunny moment on Thursday saw me finally sail my latest model boat - and I'm pleased to say that it has turned out very well.

Almost silent on the water, it tootles around with an nice range of speeds, from scale a couple of notches up on the transmitter to get out of trouble at the top. Tweaks to the weight distribution mean that at full tilt, the bow rises slightly rather than digging in and eating part of the lake!

Cassiopeia sails for the first time

A squirt of grease up the propshaft seems to have cured the very minor water ingress too. Radio reception is fine everywhere on our admittedly small lake.

All in all, a good Thursday morning boat. I might not have won any prizes, but I have made something very usable and that's a success in my book.

Talking of the competition, the torrential rain rather messed this up apparently but the winner, and a boat I wouldn't hope to beat for ingenuity or attractiveness, was built by Ken (no relation) Parker:

Percy the paddle steamer

Friday, June 17, 2016

Viking in the garden

Viking

I've been stupid busy over the last few days so a bit light on blogable modelling.You'll have to make do with this photo taken a couple of years ago showing our G scale model of the Isle of Man railway diesel "Viking" running in the garden. 

Sadly, the real Viking is a bit broken at the moment and unlikely to ever return to traffic. Worse, the replacement diesel which cost a fortune is just as broken despite a change of engine. 

No 17 is still in the shed at Douglas though, so maybe a way will be found for her to run again!

No.17

Thursday, June 16, 2016

Super glue?

 Using superglue to assemble laser cut wooden kits has been a trick used by the flying aircraft fraternity for years. Ever the traditionalist, I prefer a PVA glue, but a recent project saw me looking for a faster fix. 

My standard superlue is Zap-a-Gap green label but this soaks into the wood so fast, it's gone before the joint is made. 

A trip to the local DIY shed saw me return with a couple of Loctite products. 

Power Flex is a lot of packaging around a small tube of gel glue. Squeeze the grey sides and the plastic squeezes a tube inside. The glue has the consistency of toothpaste (don't mix them up) and sits on the wood perfectly. It certainly did the job, my only complaint is that there doesn't seem to be much glue supplied. I scrapped through the project, but only just. 

Brush on is as it says, a thick glue applied with a brush. It's not as viscous as the gel but more than the runnier Zap. Sloshing it into place with the brush in the cap works well. If it soaks in, the process is slow enough to allow a joint to be made.

I remember trying a Zap version years ago and liked it. The problem was that it dried up in the tube a bit fast. That and I couldn't get any more. 

2 recommendations then. At just under a fiver each, the Zap still looks cheaper, but they work, so I can live with the price. Modellers who like to complain, "I don't get on with superglue, have you anything made from boiled horse" would be wise to give these a go.

Wednesday, June 15, 2016

Warehouse Wednesday - North Parade Worcester


North Parade Warehouse

Beautiful isn't it?

A real warehouse, but full of ornate detail. To quote the entry from British Listed Buildings, "The most architecturally elaborate warehouse in Worcester associated with this significant regional industry.". If anyone knows a more architecturally elaborate warehouse in the country, I'd be interested to see it.

Behind me is the river Severn. Goods would be landed in front of the building and carried over the road you can see in the photo.  

I don't know anything about the building, but wonder quite why it is as decorative as it is. A few metres along the bank is a far eaiser to model warehouse.
South Parade Warehouse

Nice ghost signs, and without the twee, but practical, balconies, it would be an interesting and very useful (in model terms) structure. Not nearly as pretty though.

Tuesday, June 14, 2016

Goofy's Baggage Car

goofy

My all time favourite model railway wagon is Triang's Giraffe Car. It wasn't an original design though, the basic idea came from American firm Lionel who produced an O gauge version.

Adding one of these to my collection has always been part of the plan, but I've never seen one for sale and don't fancy trawling eBay - there's no fun in that!

A few weeks ago I spotted a relative. Part of a Disney range, this is Goofy's baggage car. Basically the giraffe car with Mickey Mouse's sidekick looking out of the top. For £15, I couldn't resist.

Needless to say, the mechanism needed attention.

Wagon insides

Removing the body is simple, there is screw at each end. When this was designed, models were intended to come apart for servicing so no stupid plastic clips to break here.

Inside, the counterweight had come lose, but popped back in easily enough. There is a spring to hold Goofy up and this was long gone. Rooting around I found something that with a bit of plier abuse could be used. It was too strong - the grey arm rises on a ramp and the spring resists this so it needs to be weak enough for the ramp noto to lift the wagon from the track - but streatching it solved this.

While I was at it, the plastic body visited the sink for a quick scrub in washing up liquid and tepid water. Doing this to old rolling stock makes a huge difference as the stuff tends to get filthy over the years. A wash often makes it sparkle again.

Reassembly completes the job and Goofy is back on form.

Goofy wagon

Monday, June 13, 2016

Beam engine for sale


Time to dispose of one of the projects I bought in a fit of enthusiasm years ago and now have to admit, I have neither the skills or time to complete. 

Spotted in a local auction house, this 1:12 scale model of a Stothert & Pitt beam engine looks pretty good. Whoever made it did a good job. Most of the remaining work seems to involve assembling the cylinder and some valve gear. Sadly, it's going to take machining and lathery and much as I'd like to aquire the skills, that dream is a long way off. 


I did enjoy laying out the parts for the photo though, so at least I got a bit of fun out of it.

Sunday, June 12, 2016

Tractor heaven at the Kenilworth show

Ford 5000 and 7000

Off to the Kenilworth agricultural show last Sunday Oh Arrr.

While sensible people were browsing the country crafts and tat sales stands, I headed over to the classic farm machinery section where there was a foyne display of old tractors as well as their more modern (and massive) cousins in use today.

Orange tractor

Being nerdy, I quickly collected photos of old farm equipment plus lots of shots showing wear and tear (what the antique trade calls "patina") on the engine parts as a guide to painting.

Besides farm impelments, there was also plenty of classic cars.

Morris Minor engine

Again, very nice, even if some idiot had parked a modern BMW in the middle which I've had to clean out of the photos.

Trainwise, were limited to this:

Train

and the best collection of Big-Big trains I've seen for a while, with added religious messages.

Gods wonderful train set


Saturday, June 11, 2016

A boat project meets the deadline

Red boat front

I'm pleased to say that my "Chairman's Challenge" boat is ready for this weekend's KMBC open day.

As you can see, the colours chosen will stand out on the water, I'll be able to see the model from the other side of the lake. My choices are based on a prototype photo showing a red hull and blue anti-fouling paint. The cream wheelhouse and brown rear cabin are my idea and the green roof - well I'd originally thought grey but once the colours were laid on, the model really needed a "prettier" colour.


Red boat rear

At the back there is a stainless steel exhaust. This is painted with Mr Hobby colour and the portholes are Darkstar "Molten metal" brass. A final spray with Humbrol satin varnish brought all the colours together and also made them "zing" a bit. 

Navigation lights and a spotlight came from the spares box and can be made to operate. At some point I fancy trying a radio controlled switch so I can operate them from the handset. These 2.4ghz sets all have at least 5 channels and I'm only using 2 at the moment.


There is only one slight snag. Thanks to a double booking, I can't make the open day myself and thanks to my father feeling under the weather, he's not going either, so the model can't be entered in the competition I built it for! 

Never mind, I enjoyed the build and hopefully have a very useful "Thursday morning" boat that can be sailed at a moments notice if the weather looks nice.

Friday, June 10, 2016

Ruminating on Humbrol paint


Sage advice for model painters is to buy fresh tinlets when performing important work. This is what I did, but the results weren't what I expected. 

I'm a "man of the people" style modeller. No fancy pants paints for me if I can help it. Humbrol is readily available in many high streets and I like to think that my model-making brothers and sisters will feel confident when looking at my projects if they can buy the same materials easily. 

That and I rarely remember to buy the fancy stuff but there is a Humbrol rack in my local shopping arcade and I raided this for new tins fo all the main colours I planned to use.

The first colour to be sprayed was 103 Cream. Taking the top off, it was a tar-like consistency. With loads of thinning (white spirit) I managed to get it through the Iwatta airbrush but I'll admit it was a shock. I like my paints on the thick side, one reason I've never been keen on Revell as it is thinner, but pale bunker oil? No thanks. 

The 118 Brown was fine, although I wouldn't want it any thicker. Blue and red were perfect, as was the green, which I'd bought years earlier and half used. 

A spray can of satin varnish lasted 3 squirts before gumming up. What I got out did seem very thick. 

Come on Humbrol, I want to love your paint, but you do make it hard sometimes!

Thursday, June 09, 2016

I name this vessel...


Cassiopeia. 

Thanks to Anonymous who suggested that the boat ought to have a name plucked from the original series of Battlestar Galactica as I watched the box set during the early stages of the build.  

It's certainly better than my first thought - "Mini McBoatface". 


Cassiopeia (Biog on Wikipedia) was played in the series by the amusingly surnamed Laurette Spang. There was also a vain Queen in Greek mythology and a constellation in the northern sky. 

Naming is as usual, vinyl letters 3mm high aligned over a printed name. I'd have preferred something about twice this size, but these were to hand and I wanted to get on with painting. More on this tomorrow. 


Wednesday, June 08, 2016

Warehouse Wednesday: Corporation Green


Council house entrance

I have a theory that back in the 1950s and 60s, if the local council (Corporation) owned anything, the painted it green. Gates, fences, rollers, mowers, staff - all painted a very particular shade of green. Not Brunswick, lime or grass, a sort of bluey-green shade. 

Why Humbrol doesn't see fit to include it in their range is a mystery to me. 

Nowadays, paint buying is probably not as centralised and the desk jockeys all think they are designers, so a wide variety of huges are now to be seen. The entrance to Birmingham Council House escaped this though and is still resplendent in corporation green. 

Interesting details here. There is presumably a walkway cutting through the archway, was this an original feature I wonder? 

The heavy gates are supported on rollers running on metal strips embedded in the pavement. Nice little box for the security man to sit in too. Not a plastic cabin but proper wooden structure made by in-house carpenters no doubt. I bet they made those nice wooden inner gates too.

Tuesday, June 07, 2016

First sail


First Sail

On a quiet, but dry, evening last week, my dad and I snuck down to the model boat club to test our challenge boats. No-one was around so we switched on the transmitters and launched. 

While I'm not telling you about his, my model went very well. It sat nice and level for a start. It didn't sink (always good this one). 

Starting up, the model moved off pretty sharpish. The big propeller gives it a fair turn of speed. In fact I didn't dare take it all the way as the bow wave threatened to swamp the deck. Give it a couple of notches on the controller and it's perfectly happy. 

I'm thinking I'll be taking a bit of weight out of the bow just to tip it backward slightly. Although it's not digging in, I'd like a bit more hull above that bow wave. I'll certainly not be making holes in the front for a anchor chain!

First sail 2

Monday, June 06, 2016

Time to put on weight


Time to get the Chairman's Challenge boat on the water, and that means this pudgy little hull needs some weight to get it down to a sensible level. 

Fortunately, the kitchen sink is plenty big enough, both in length and depth (bathroom sink is too shallow) as well as being handy for worktops allowing all the lead mangling equipment can be close at hand.

To lower the hull took a heck of a lot of weight. 834g according to my scale, including a jelly cell battery. At least it should ride the waves well on the pond. 

Talking of which, take me to the water!

Sunday, June 05, 2016

What's that on the cover of Model Rail?


A picture of my Hellingly Hospital Railway model on the front of a rival magazine's cover? 

No-one was more surprised than me when this popped up, but I'll admit to being a bit chuffed. Looking inside, there are a series of short articles providing inspiration for more unusual prototypes that would make interesting model railways. Once of these is hospitals, and as illustration, they have used a photo from the article I wrote years ago for the magazine, pictures taken by Chris Nevard. 


(This isn't Hellingly, he did 3 layouts in one session at our club and every one had to be dusted)

While I don't get paid, it's nice that the model is remembered. It's also a very interesting issue which I will be pinching ideas from maybe...

Saturday, June 04, 2016

Birmingham Tram


Birmingham Tram

Trams have finally arrived at the Ian Allan bookshop in central Birmingham.

I think this is perfectly fair as the shop was the first to be moved for the rebuilding of News Street station, so it's good that the enthusiasts have now been provided with some compensatory entertainment.

Wiring the trams

There did seem to be some hurried wiring up going on while I was there though. I wonder if they are fitting DCC?

Friday, June 03, 2016

Make it again Phil


Yesterday's post showed the back end of my model boat. You might have noticed the handrails. 

These are supposed to be (as far as I can tell) made from a single piece of wood in real life, and on the model they are made from a single bit of 60 thou plastic sheet. 

Attempt 1 wasn't quite right. The methods was fine, make the pieces with the legs facing each other on the sheet so speed up marking out. I'd even worked out that the curved inner corners could be produced by drilling holes. What I didn't do was drill enough. Trying to make them along the join line left me with handholds too shallow and a top rail far too deep. 

One of the best bits of advice I've ever read came from an old issue of Railway Modeller. Someone said that when making things, if you aren't happy, do it again. You might think you can live with the error, but over time it will niggle at you. Far better to bin the part and do it again. 

Which is what I did. The dimensions are the same, I just drilled twice as many holes, further apart. And now I'm much happier.