 With a selection of kits to chose from, which one do I start with?
 For no particular reason, I picked the Feather signal. From my limited understanding of railway signalling (those who know more, please feel free to add detail in the comments section) these show drivers which direction an approaching junction is set to so they know if they are heading straight or off in another direction. Presumably this is to allow them to judge speed as there's no steering involved.
The kit makes up into a double feather with arms in both directions. In model form you can make the device light up by fitting LEDs into the holes. I've not been asked to do this thankfully although if you treat the model as a modest project rather than a simple assembly job, I can see that it wouldn't be too hard and the results really impressive.
Assembly wasn't too difficult once I'd figured out a couple of points.
The first is that the shrouds over the lights have to be formed from flat. Although not mentioned on the instruction sheet, the metal really needs to be annealed (heated to red and left to cool) to soften it. Then you find a screwdriver or bit of rod to form the shape around. One from my cheapo Jewelers set living on the modelling board turned out to be right and I bent the metal around it first with fingers and then with flat faced pliers squashing it against the screwdriver shaft.
1 spare shroud is provided and in my case - used.
Next, fixing involves locating the shroud into a half-etched grove around the hole for the light. That's not easy, especially if the bend isn't exactly right. A little wiggling with fingers locates it but then you have to hold the parts in place while soldering. I tried my normal iron but holding the shroud with all the heat around seemed impossible.
After this, I broke out the Resistance Soldering Unit (RSU) and used this with some solder paint and loads of flux. Since you can set the joint up cold and hold the shroud with the probe before applying electric juice with a foot switch, the job becomes a lot easier.
After this, the backing box is a simple fold up then located in the back of the target board in another half-etched line.
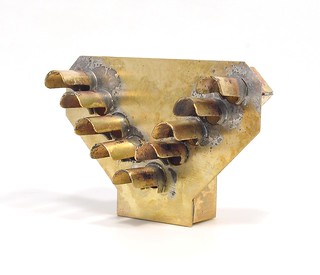
The model have been cleaned up in the sink but really needs a polish with the fibre pen and some Brasso as I've been asked to finish it in raw metal. For your consumption, I'm showing it in the unpolished state so you see how it looks straight from the workbench.
No comments:
Post a Comment