 Reading the 01 diesel instructions (yes, really !) the bonnet doors can be attached before or after bending the thing to shape. I looked at the half etched area they were to be fitted into and decided that if I tried bending before fitting, the result would be a mangled mess. Sometimes you need structural strength in a part before you mess with it.
Or at least I do. Reading on, it's assumed that you bend then fit, but that must the way the good modellers work.
Anyway, the doors are soldered from the back through holes in the sides. To assist alignment, the handle holes are etched through both parts and so if you line them up, the part is in the right place.
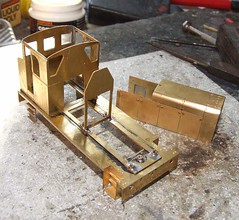
Bending the wrapper is more interesting. I tried bending using the half etched relieving lines on the back as a guide but this didn't work very well. To be honest I'm not good at getting bends in the right place and having bomped a load if rivets in the sheet didn't help as attempts with pliers were hindered by me not wanting to flatten them again. Using the front as a former worked well though and after a little tack soldering all appeared well - or at least the wrapper stopped at the end of the former as it should.
With the doors in place, access to solder the top to the plate is limited but enough for big blobs of molten metal to be flung in place.
The fuel tank hump former were fitted even through you are told not to use the back one as it gets in the way of the motor. Anticipating this I'd hacked a hole out of it the same size as the one I'd already put in the cab. These set the width of the bonnet and keep everything in line.
Provision is made for separable bonnet & cab assemblies but even the instructions say this is a bit pointless. I suppose if you like to display your model in bits it's OK but with livery being plain black or green, there's no other reason.
Finally fitting of the bonnet to it's sub-plate took place with the unit removed from the footplate. Access is a little better this way but in the end I carefully worked from the bottom and burnished all the solder away so the thing would screw down properly. If I've not moved any of the fixing nuts that is. I'll find out about that later.
No comments:
Post a Comment