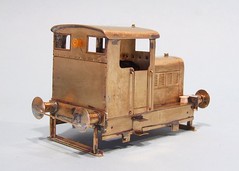
 One of the most notable omissions from the Tag Models kit was the ironwork dangling from the buffer beam. Presumably this is to protect the underframe from detritus on the track but for the model it's more important visually as it provides both height and detail to an otherwise blank area. I made the girders up from brass angle although bending some sheet wouldn't have been too bad as long as the fold had been scored properly to aid the bending.
Up to this point all the soldering had been carried out with the trusty Antex iron but for the buffers I decided the RSU would be better bet. The overlays on the buffer beams mentioned yesterday had covered the mounting holes and rather than re-drill these I simply removed the pips from the buffer shanks, tinned the ends and fixed them with the RSU. A little adjustment was required, something I'd have avoided if I'd measured rather than working by eye, and there we had it. The ends of the loco looked like the ones in the painting I was following.
With the metalwork finished it could move on to plastic fiddly bits. The back of the bufferbeams were turned into a C-girder formation with the addition of a few scraps of microstrip. New sandboxes from square rod and more offcuts of thin sheet appeared. These can just be seen in some of the pictures but I couldn't find a clear photo. They are square and about this height. Maybe slightly fatter but I can't be sure and these look OK.
Finally a rear light can from some of those leftover moldings stored in a little drawer to come in useful "some day". At last this day has arrived. Heaven knows what this was once upon a time but now it's a light so the driver can see what he's reversing in to.
1 comment:
Given it's industrial use, those bars under the buffer beam are probably to catch it when it derails!
Post a Comment