 Returning to the bonnet I fitted the radiator and was initially very pleased with how well it went on. The step section at the back clipped nicely above the bonnet doors and getting it vertical took only a little prod. No gaps were to be seen and happy I soldered it in place.
Removing the half etched bonnet top from the fret I test fitted it and it too looked promising. I still wasn't looking forward to bending it up but things looked good.
They continued to look good right up to the point where I examined a prototype photo and realised that if I used the parts as supplied the top would overlap the radiator and the fit would be even worse than the panels on the real thing.
Pondering for a few minutes, I reasoned that if I removed the step from the radiator, the top would but up against the back of it and all would be OK. Out came the piercing saw (a tool far more useful than I would have thought a few years ago and now indispensable to me) and after carefully marking the cut, gently sawed the metal away. A combination of cutting and twisting away the excess saw the radiator given the correct flat back. I wish I'd spotted this before fitting as the job would have been a bit easier.
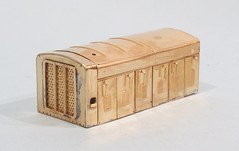
Bending the top started with a gentle bend just to give the metal some strength. Then the sharp bends were made around some brass rod using the handrail holes as a guide for position. Soldering started at one side from the inside. Lots of flux and quick bursts of heat were the order of the day as I didn't want the rest to the ting falling apart !
I found the fit to be excellent but the final side bend needs to be made slightly sharper than expected so the edge tucks in properly at the top of the bonnet doors. You can't get an iron in easily here so the metal has to hold itself in place while you heat as it's difficult to apply enough pressure from outside to push it where you want it.
No comments:
Post a Comment