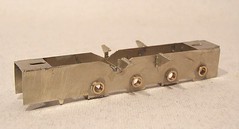
Nice simple job this. Set the chassis jig (how I love this tool) using the coupling rods, slide the bearings on followed by the frames, having reamed each out as required, then solder the spacers in.
Result: a nice square chassis. In P4. Oops.
This is the sort of thing you learn building the test etch. Shrinking a model locomotive kit down from 7mm means the spacers are too wide for us OO chaps and our underscale axle lengths.
A quick call found the supplementary etch of correct spacers in the post the next day. Removing the wide ones and re-jigging the chassis allowed me to get this far painlessly. I'm dubious about the rear axle as my jig only has three axles but as it only carries the jackshaft I'm hoping to get away with it. I can ream the hole out a bit more than the others and let the shaft slop around a bit more if required.
No comments:
Post a Comment