One of the MOT "issues" that my van has involves the back brakes and handbrake not putting sufficient effort into stopping. I had had a tinker with them before the test to do up the adjusters (old VW brakes aren't self adjusting for wear, you get to scrabble around in the dirt for that) but obviously not enough.
Stripping and cleaning up the brakes has always been a job I meant to do but never quite got around to. The thing that scared me was removing the hub - a job that on my Beetle involves undoing the central nut which is torqued up to some phenomenal level. This involves a 3/4 inch drive socket and 6ft length of scaffolding pipe !
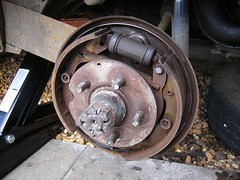
Looking in the manual properly and then whipping the wheel off the camper showed this wasn't necessary. The hub comes off by removing two 11mm bolts from the face, winding the adjusters in and then wiggling/levering the part off. If I'd realised it was that easy I'd have done this job years ago !
Inside the parts were reasonably clean. The shoes, which I'd expected to replace, have loads of life left in them. The only obvious problem was a seized front adjuster which (presumably) explained why I couldn't get the brakes working properly.
Having gone to the bother of getting this far, everything was removed and cleaned up. The adjuster freed up after some Liquid Wrench and a bit of twisting in the big vice. Copper grease on this and all the pivots (just a smear) hopefully means it will be a while before this happens again.
As the Haynes manual says, re-assembly is the reverse of above. Except that the springs holding the shoes against the back plate were clinging on to rusty pins with even rustier cupped washers, one of which failed during assembly.
Handy Hint 1 - Get a brake fitting kit (German & Swedish part number 62534, £3.50) when you buy new shoes. If I'd done this the whole job would have been done in one sitting, instead I have to go out and remove the wheel & hub again to finish it.
Handy Hint 2 - Take photos before dismantling things. The picture shown saved my bacon when I was trying to work out how the distance piece fitted. I could see the slots but didn't realise it hooked over the handbrake lever. It's also handy to know when things like springs go in front or behind parts.
No comments:
Post a Comment