 To get the Ruston locomotive finished there were just a few little tasks.
Varnish - A coat of Humbrol Satin Coat wafted over the entire model. I was wearing a spray mask but it wasn't necessary because I held my breath until I was confident that the transfers weren't going to lift like they did on the Y7.
Weathering - Just a light blast of very thinned brown to add some colour. The finish was so good I hadn't the heart to really go for it.
Glazing - Clear plastic from the window of a box I think. Cut to size and stuck in with Zap general purpose glue. This model will get handled and I hope the combination of flexible glazing and slightly rubbery glue will allow it to survive. Those frames are too big for even me to consider using Krystal Klear !
Stick the roof on - More Zap all purpose for the same reason. It should allow removal if we need to get inside the cab for repairs.
Buffers - The heads are too small but they fill the shanks and look OK. All but one went straight in and even this just needed the hole cleaning out with a reamer.
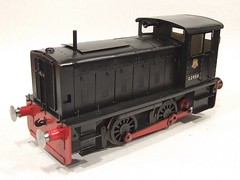 Pickups - I'd fitted one set but thought that even though the model isn't going to be used on a layout very often all 4 wheels ought to collect electricity.
Final photos - Which you can see here.
And now a quick trip to Stourbridge to hand the model over to Trevor. Look out for it next time you see the Mercian stand. I warn you though, it's a good looking model and could tempt you to move over to the larger scale !
No comments:
Post a Comment