Lots of grumbling this afternoon.
The EM gauge axle arrived and so I was able to fit the cranks to the locomotive. This wasn’t too painful – clip the threaded portion off the ends of the axle then solder the cranks on. With a hot iron, whiff of flux and tiny amount of solder the job is soon done. It’s something that’s a lot easier if you are confident. Trying to hold the heat on for too long is a route to disaster as the laminations that make up the cranks separate.
The trouble starts when the rods are attached and you want the wheels to go round.
First, the cranks don’t stick out beyond the wheels so the rods have to be bent in to meet the pins. This effectively makes them shorter so the holes have to be elongated to compensate.
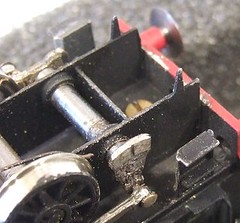
Having got the wheels rotating with the body off, this is fitted and the cab steps get in the way. Only a little, but enough to jam everything up solid. So a “happy” hour of filing the crank pins down as small as they can go and chamfering the edge of the steps ensues. You can see the result in the photo. The cranks and steps miss by less than a millimetre but it’s enough.
With the clearances restored I then discover that the rear holding nut has come off inside the cab. Since I don’t want to remove the roof I tapped the hole out to 8BA (Originally it was 10BA) and use the bigger bolt. It’s not got much to bit on but the result seems to work.
Oh, and tightening up either retaining bolt hard twists the chassis so don’t do that either.
But it’s done. A little touching up of the paintwork where I filed metal away for clearances, a dash of red on the waggly bits and we are finished I think.
No comments:
Post a Comment