The coal rails have given me grief and loads of it.
First attempt – Use the supplied etched ones. These have to be bent to go around the corners and then the uprights are curved to fit the tender flair. I tined the bits to be soldered to the whitemetal with normal solder so the whitemetal version would stick. Nothing seemed to work. One of the uprights on each side got in the way of the divider at the back of the coal space. I fiddled away for an hour or so and pulled them off in frustration. They didn’t look much like the version on the prototype anyway.
Second attempt – Marking the positions using a plan, I made some uprights using 0.45mm wire. I then ran wire around for the rails. All soldering was carried out with low-melt solder. It sort of worked except at the front ends where I couldn’t get the curves right. The horizontals weren’t great either as they could be a bit lumpy where the solder ran along them. The joints were also weak but I couldn’t use proper solder as it would melt the sides.
Third attempt – After leaving things for a night and coming back fresh, I straightened out the etched rails and re-tinned them. Looking at the plan one upright does coincide with the back of the coal space so I clipped off the let that gets in the way. The mid point was marked and the corners bent so the rails were the right shape rather than trying to form and fit.
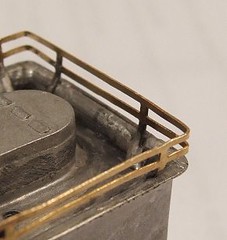
The end result is pretty good. I’m still not entirely happy that they are flat rather than round in profile, but what I have looks neat and tidy which is more important. When replacing parts in a kit it’s important that the replacement doesn’t look worse than the original – or there’s not much point in making the change.
No comments:
Post a Comment